
One of Mom's favorite cookies to make were Holland Butter Cookies -- when asked what she was making for a dessert, she would say "Hollands". I also make these for Christmas, although we finished most of them off before Christmas day. They are simple to make and taste good -- two key criteria for most of us.
Cream: 1 cup butter and 3/4 cup sugar
Add the following and mix until it doesn't stick to the bowl:
1 egg yolk beaten
2 cups sifted flour
1 tsp. vanilla
Press on cookie sheet to 1/4 inch thickness. Scatter nuts (3/4 cup chopped nuts) on top and press lightly into dough. Bake in 300 degree overn until light brown (bake longer than most cookies). Let cool a few minutes and cut into squares (do not let cool too much before cutting).
For Christmas, Mom sometimes used used red and green sprinkles instead of the nuts for a festive touch.
Sunday, December 28, 2008
Key Lime Spritz Cookies
I had saved this recipe for key lime spritz cookies from Midwest Living last year (it intrigued me) and made them as part of Christmas dessert. They were a big hit, so wanted to post the recipe. Here is the link to the recipe: http://www.midwestliving.com/recipe/cookies/key-lime-spritz-cookies/
I didn't have key limes or key lime juice so I used regular lime. While the icing was optional, I think it was a good addition. I didn't take a picture, but there is one with the recipe.
Enjoy
I didn't have key limes or key lime juice so I used regular lime. While the icing was optional, I think it was a good addition. I didn't take a picture, but there is one with the recipe.
Enjoy
Tuesday, December 9, 2008
Italian Pot Pies
This is a delicious recipe from the most recent issue of Everyday Food. I used a homemade tomato sauce that I have on hand in the freezer. I also made this in the morning, put in fridge, and brought to room temp for an hour before baking.
Ingredients
Serves 4
1 tablespoon olive oil
1 medium onion, finely chopped
2 carrots, finely chopped
Coarse salt and ground pepper
1 pound ground beef sirloin, thawed if frozen
2 cups homemade or best-quality store-bought tomato sauce
1 cup all-purpose flour (spooned and leveled)
1/4 cup grated Parmesan (1 ounce)
1 1/2 teaspoons baking powder
1/4 teaspoon crushed dried rosemary
4 tablespoons butter, melted
1/2 cup whole milk
Directions
Preheat oven to 450 degrees, with rack in lowest position. In a large skillet, heat oil over medium. Add onion and carrots; season with salt and pepper. Cook, stirring occasionally, until tender, 6 to 8 minutes. Add beef, and cook, breaking up meat with a wooden spoon, until no longer pink, 3 to 5 minutes. Add tomato sauce; bring to a boil, reduce to a simmer, and cook, stirring occasionally, until meat mixture has thickened, 8 to 10 minutes; set aside.
In a medium bowl, whisk flour, Parmesan, baking powder, rosemary, and 1/2 teaspoon salt; make a well in center, and add butter and milk. Stir just until dough comes together.
Spoon meat mixture into four 8-ounce ramekins; mound dough on top. Place on a large rimmed baking sheet; bake until topping is golden brown and a toothpick inserted in topping comes out clean, 10 to 12 minutes.
Saturday, December 6, 2008
Creamy Patoato Soup
Ever since Tastespotting came back, I have been watching it day by day. Last week, I saw a delicious looking recipe for Creamy Potato Soup and I knew I hadto try it. Ever since I first tried Baked Potato Soup at The Outback, I have been trying to replicate it.
My first attempt to replicate it was disgusting. I didn't realize that potatoes turn gray/brown if you leave them out. After that episode, I put my dream on the back-burner--until I saw this picture.
One thing that really excited me about the soup was that the recipe called for the use of an immersion blender. As luck would have it, I recently received one as a surprise gift! I was surprised about how much the soup changed after I blended it. It really thickened up into what appeared to be a hearty dish.
The soup turned out really well. It was a little bland by itself, but with the bacon, cheese and green onions, it was really quite delicious! I think probably it just needed a little salt. What is the rule of thumb really with "Salt to taste"? I never add enough.
I increased the ingredients to make 1 1/2 recipes and that was just enough for 6 hungry guests with one bowl extra. Be sure to make tons of toppings available for the best results.
You can check the recipe again here, but let your mouth water after the flavors melded in this steaming bowl:

My first attempt to replicate it was disgusting. I didn't realize that potatoes turn gray/brown if you leave them out. After that episode, I put my dream on the back-burner--until I saw this picture.
One thing that really excited me about the soup was that the recipe called for the use of an immersion blender. As luck would have it, I recently received one as a surprise gift!
 I was surprised about how much the soup changed after I blended it. It really thickened up into what appeared to be a hearty dish.
The soup turned out really well. It was a little bland by itself, but with the bacon, cheese and green onions, it was really quite delicious! I think probably it just needed a little salt. What is the rule of thumb really with "Salt to taste"? I never add enough.
I increased the ingredients to make 1 1/2 recipes and that was just enough for 6 hungry guests with one bowl extra. Be sure to make tons of toppings available for the best results.
You can check the recipe again here, but let your mouth water after the flavors melded in this steaming bowl:

Wednesday, December 3, 2008
Whipped Hot Chocolate For Two
The Barefoot Contessa Family Meals cookbook is spectacular. I love the pictures, I love how the writing sounds just like her show, and so far, I love the food.
Last night, it was particularly cold in Southern California (like 55!). Joey and I decided to catch up on some episodes of Heroes and drink hot chocolate. I was excited to try this recipe because it would allow me to use my new immersion blender for the first time!
The hot chocolate was some of the best Joey and I have ever had. It had a flavor all to itself. The chocolate flavor powered through. It was the perfect evening treat for a cold day, and simple to make! Just increase the amounts if you want to make more, this recipe makes two generous size mugs (3 mugs with my Fiestaware ones).

Whipped Hot Chocolate for Two
Ingredients:
1 1/2 C. Whole Milk
1 C. Half and Half
2 ounces semi-sweet chocolate chips or semisweet baking squares
2 ounces milk chocolate (go for non-Hershey. I used Cadbury)
1/2 T sugar
1/2 t vanilla extract
Directions:
1. Heat the milk and half and half in a saucepan over medium-low until just before simmering (small bubbles should appear around the edges) stirring throughout to avoid the milk skin.
2. Meanwhile, roughly chop chocolates
3. Remove pan from heat and add chocolates. Stir until melted.
4. Return pan to heat. Add sugar and vanilla. Heat until desired temperature.
5. Remove from heat and whip hot chocolate with the immersion blender a couple of pulses before serving.
6. Pour into mugs and enjoy immediately! (contents of mug may be hot, use caution)
Monday, November 24, 2008
Braised Brisket with Cranberries
Thursday I whipped up Braised Brisket with Cranberries. I gave it a creative flair by making it in the crock pot instead of braising it. Probably not the best choice--but I just thought it would be easier than planning to be home for 3 1/2 hours in one go on a work day.
I also skipped the browning of the meat. This probably was also a mistake because it didn't have that delicious carmelization. But whatever, I decided to be daring.
This corkscrew gave me a lot of problems with the timing and I ended up leaving ridiculously late for work (but it didn't actually take long to get there). I totally have a nicer, more useful corkscrew too, but alas it was at Joey's house.
Anyway, once I got the wine open, I poured it, the broth, the spices, the onions, the meat, the cranberries and whatever else it called for and set it to forget it.
After work, I came home to a great smelling apartment. I served the brisket with cornbread...I think I should have tried the real method. As it turned out, the brisket tasted exactly like the other brisket I made before with completely different ingredients. The broth/sauce was missing flavor. The brisket tasted best when I added a bunch of Heinz chili sauce to the mixture.
Recipe here. If you try it the real way, and it's amazing, let me know.
Sunday, November 23, 2008
Flat Iron Steak Tacos
Everyday Food is my favorite cooking magazine. I also get Cooking Light, but I am more likely to find recipes in EF. The thing that sort of annoys me a little bit about the magazine is that every single thing in it is also on Martha Stewart's site. That's good for you I guess, because that means you too can make all my delicious meals for free!
Last Sunday I decided that it was time for cooking week. On Monday I made the tacos. Not being good with using leftovers, I used the leftover steak once and will probably use it again for sandwiches.
Here's the thing though, I didn't exactly follow the recipe. Recently, Joey hasn't been so fond of cumin so I omitted it which as a result omitted any special seasoning from the tacos, and they were actually minorly flavorless despite the mass of Lawrys Seasoning Salt I poured on the meat before broiling it.
I also did not heat the tacos over the low burner flame--I just put them in the microwave between two wet paper towels. I don't like when you make a couple of tortillas and then they end up all being cold by the end.
We served the tacos with beans to round out the meal--and coleslaw which you are supposed to put on the tacos. I was no good at shredding the cabbage even though I read the directions in my cookbook.
I recommend the recipe even still. The steak was a perfect medium rare after I broiled it for two times the amount recommended. The slaw added a satisfying crunch, the cojita cheese was a perfect flavor booster and a little more salsa would have rounded it out perfectly.
Recipe here.
Saturday, November 15, 2008
Pie Crust Dots
The biggest problem about building a registry is the realization that there are all these great things out there that you don't have but could have. Then you start wishing you had something right now so you could make some variation of some recipe that you were really jonesing for. Just that happened the other night.
I made some pie crust cookies, but as usual with cookies where you roll out the dough, there was a lot of leftover pieces. I decided to experiment with these leftover pieces because I don't actually have a rolling pin--and trying to roll the leftover pie crust to just the same thickness as the other pie crust proved problematic with the drinking glass.
As it turned out, my little experiment was absolutely delicious and is recommended to all.
Pie Crust Dots
Ingredients:
1 pie crust (I used Pillsbury refrigerated dough)
1 cup mini chocolate chips
sugar
cocoa
cinnamon
Directions:
1. Heat oven to 350
2. Roll pie crust into one sheet
3. Mix together cocoa and sugar in a small bowl to taste
4. Mix together cinnamon and sugar in a small bowl to taste
5. Pinch off 1 1/2 teaspoons of dough
6. Fill Dough with mini chocolate chips and roll into a ball
7. Rub the ball in either the cocoa or cinnamon mixture and set on a cookie sheet (I couldn't find mine so I used a loaf pan)
8. Repeat until you have used up all the dough.
9. Back for 7-10 minutes until golden brown, chocolate centers may not fully melt.
Enjoy!

I made some pie crust cookies, but as usual with cookies where you roll out the dough, there was a lot of leftover pieces. I decided to experiment with these leftover pieces because I don't actually have a rolling pin--and trying to roll the leftover pie crust to just the same thickness as the other pie crust proved problematic with the drinking glass.
As it turned out, my little experiment was absolutely delicious and is recommended to all.
Pie Crust Dots
Ingredients:
1 pie crust (I used Pillsbury refrigerated dough)
1 cup mini chocolate chips
sugar
cocoa
cinnamon
Directions:
1. Heat oven to 350

2. Roll pie crust into one sheet
3. Mix together cocoa and sugar in a small bowl to taste
4. Mix together cinnamon and sugar in a small bowl to taste
5. Pinch off 1 1/2 teaspoons of dough
6. Fill Dough with mini chocolate chips and roll into a ball
7. Rub the ball in either the cocoa or cinnamon mixture and set on a cookie sheet (I couldn't find mine so I used a loaf pan)
8. Repeat until you have used up all the dough.
9. Back for 7-10 minutes until golden brown, chocolate centers may not fully melt.
Enjoy!
Thursday, November 13, 2008
Pie Crust Cookies
When I was little, my favorite part about Thanksgiving preparation were the little scraps of food my mom and dad made as part of the fun and the pre-feast. My mom's specialty was pie crust leftovers. She took the edges she cut off her pies and sprinkled them with cinnamon and sugar and then put them in the oven so we had some pie crust cookies. I really liked them before they went in the oven best...
I recently bought this pie crust and I didn't know what to do with it. For some reason, pie didn't cross my mind at all. The thing with pie is that it is hard to share and seems too fancy, I just wanted to make something simple and delicious.

I settled on pie crust cookies, a blast from the past. I had the refrigerated dough so it was easy as pie to roll it out. I cut the dough into star shapes with a very nice cookie cutter I didn't even know I had. I cut out the stars one by one and put them on the tray. It was so nice to be able to use my cookie cutters without the hassle of rolling out and refrigerating bits of dough all day long.
I filled the tray and then gathered the toppings. The thing about pie crust is that it is not super sweet, so the toppings have to be a little sweet themselves to give a depth of flavor into the cookie. I beat an egg in a glass and took out my silicone pastry brush. I mixed together some cinnamon and sugar. Then I went out on a limb and mixed together some cocoa and sugar. I painted the stars with the egg and then sprinkled on the toppings.
The cookies are really good, a big hit to everyone who has tried them. And so easy and just a little different than the average chocolate chip cookie. I think they also look great--kind of like a fancy dessert.
Pie Crust Cookies
cinnamon
sugar
cocoa
1 egg (or you could just use the white)
1 pie crust
cookie cutter
Preheat the oven to 350
1. Beat the egg with a fork
2. Combine cinnamon and sugar in a small bowl to taste
3. Combine sugar and cocoa in a separate small bowl to taste
4. Roll out dough and cut into desired shapes, place on a cookie sheet
5. Paint cookies with egg
6. Sprinkle, alternating by cookie, with sugar mixtures
7. Bake at 350 for 7-10 minutes or until golden brown

I recently bought this pie crust and I didn't know what to do with it. For some reason, pie didn't cross my mind at all. The thing with pie is that it is hard to share and seems too fancy, I just wanted to make something simple and delicious.

I settled on pie crust cookies, a blast from the past. I had the refrigerated dough so it was easy as pie to roll it out. I cut the dough into star shapes with a very nice cookie cutter I didn't even know I had. I cut out the stars one by one and put them on the tray. It was so nice to be able to use my cookie cutters without the hassle of rolling out and refrigerating bits of dough all day long.
I filled the tray and then gathered the toppings. The thing about pie crust is that it is not
 super sweet, so the toppings have to be a little sweet themselves to give a depth of flavor into the cookie. I beat an egg in a glass and took out my silicone pastry brush. I mixed together some cinnamon and sugar. Then I went out on a limb and mixed together some cocoa and sugar. I painted the stars with the egg and then sprinkled on the toppings.
The cookies are really good, a big hit to everyone who has tried them. And so easy and just a little different than the average chocolate chip cookie. I think they also look great--kind of like a fancy dessert.
Pie Crust Cookies
cinnamon
sugar
cocoa
1 egg (or you could just use the white)
1 pie crust
cookie cutter
Preheat the oven to 350
1. Beat the egg with a fork
2. Combine cinnamon and sugar in a small bowl to taste
3. Combine sugar and cocoa in a separate small bowl to taste
4. Roll out dough and cut into desired shapes, place on a cookie sheet
5. Paint cookies with egg
6. Sprinkle, alternating by cookie, with sugar mixtures
7. Bake at 350 for 7-10 minutes or until golden brown

Monday, November 10, 2008
From Garden to Table: A Special Salad


The lettuce has been growing like gangbusters, and we harvested our first bit tonight. Here's a recipe for a delicious, light salad that would be great for the holidays as well.
Lettuce mix (I used romaine and butter)
Pomegranate seeds
Celery
Olive Oil
Red Wine Vinegar
Pick the lettuce from your garden. (Just kidding, I know it is getting down to 30 degrees tonight out there!) Shred and toss with chopped celery and pomegranate seeds. Add a few shakes of red wine vinegar and olive oil to taste.
Baked Brie with Pesto in a Bread Bowl

So, Jeff's Aunt Cindy (a future contributor to this blog and an amazing cook) and I were preparing appetizers for CJ's party. I was thinking cheese plate, chips and salsa, hummus and pita, and cake. Cindy saw the extra brie I had purchased and the left-over loaf of No Knead Bread from the night before and said, "Let's whip up a baked brie!" Never one to turn down a cooking experience with Cindy, I agreed. Soon we were clipping oregano, thyme, and basil from the garden to make a simple pesto and in no time at all the smell of melted cheese was wafting through the house. What a way to impress the guests! Here's the recipe, as close as I can record it:
1 bread bowl (sourdough or other crusty bread like homemade no knead bread)
1-2 brie triangles
herbs, olive oil, and pine nuts
olive oil
Slice the top off the bread and cut out the center to create a bowl. Trim the edges off the brie and cut it in a few large pieces. Brush the inside of the bread and inside of the top generously with olive oil. Chop the herbs and pine nuts in Cuisinart; then slowly add olive oil to make a pesto. Brush the pesto generously on the inside of the bowl and inside of the top. Spread brie out over bowl and put bread top on.


Bake for 1 hour at 350. Serve with extra bread from inside bowl to scoop, plus additional bread or crackers. When the brie has been eaten, you can slice the bowl up as an additional appetizer.


Bake for 1 hour at 350. Serve with extra bread from inside bowl to scoop, plus additional bread or crackers. When the brie has been eaten, you can slice the bowl up as an additional appetizer.
Sunday, November 9, 2008
Peasant Lunch
My mom was staying with me for a couple of days last week and we did a lot of cooking. However, on Saturday we were in the mood for something simple yet delicious for lunch before a birthday party. We decided on a peasant lunch.
We went to Trader Joe's and bought a new cheese that we had never had before. The cheese was white and made with sheep's milk. We cut the cheese into slices and put them on a plate. Then we cut up slices of various other things I had lying around to compliment the cheese.
We sliced up a gigantic avocado from Joey's tree, some pickling cucumbers, a little basil and apples from the Farmer's market that morning and some French bread and sorted it out on a plate. We had some tomato--but it already seemed like too much food so we nixed that. The food turned out to be delicious and just the thing for we hungry two.

Thursday, October 30, 2008
First Hard Freeze
 Fall's first hard freeze in our area of north central Indiana means that all remaining vegetables must be harvested and stored. Cheese sandwiches (usually sharp cheddar on wheat bread) with home grown tomatoes on top, broiled until the cheese is bubbly and the tomatoes hot and soft, are only a memory now.
 The abundance of eggplant and zucchini in this year's garden
caused me to search past recipes for inspiration. My sister-in-law Gail's recipe filled the bill.
 Gail's Greek Vegetable Skillet Serves 4
1 lb. ground beef
2 med. onions, thinly sliced
2 med. cloves garlic, minced
1/2 lb. muchrooms, sliced
3 med. tomatoes, cut in wedges
1 small eggplant, cubed or sliced depending on type
2 med. zucchini , cut in 1/4 in. slices
1 med. green pepper, chopped ,
1 T. salt, more or less
1 t. oregano, fresh or dried
1 c. cooked rice
1/4 c. chopped parsley
Brown meat, then onions, garlic, mushrooms and cook until tender. Add tomatoes, eggplant, zucchini, green pepper, salt and oregano. Cover and simmer 25 minutes stirring occasionally. Stir in rice. Cover and cook 5-10 minutes more. Sprinkle with parsley.
Delicious!
Saturday, October 18, 2008
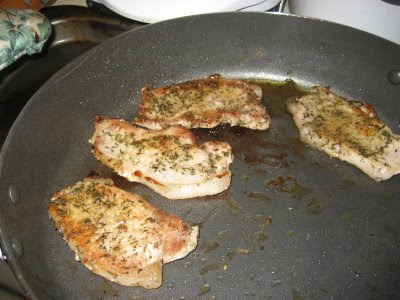
Spice Rubbed Pan Seared Pork Chops
I've hit my stage of life where I am concerned about how much things cost. Today I went to the store with every intention of getting a nice pork tenderloin for dinner and serving it with corn I had from the farmer's market. However, when I arrived at the store, I learned that pork tenderloin was $15! I couldn't bring myself to buy it. Plus, it was about 1 1/2 pounds more than my recipe calls for*. So, I scoped out the meat department and settled on thin cut boneless pork chops.
I applied the same rub I was going to use on the tenderloin to the pork chops. The corn takes about 10 minutes to cook (or less) and the pork chops probably took about 5. It was a quick dinner that looked great in just minutes! The pork had lots of flavor made up of spices just lying around the kitchen. I think the meal ended up being about $7 total--and there are leftovers for at least one more meal for two. I had some avacados lying around and whipped up a classic avacado and tomato salad on the side for just me.
Recipe adapted from Ellie Krieger
Spice Rubbed Pan Seared Pork Chops
5 boneless pork chops, thin cut
1 t kosher salt
1 t cumin
1 t dried thyme
1 t dried oregano
1 t ground corriander
1 t garlic powder
1 T olive oil
1. Heat oil over medium heat in a large (preferably non-stick) skillet.
2. Meanwhile, mix together the spices.
3. Sprinkle the spices over the chops and press into meat with a dry hand.
4. Put meat in the pan and cook for 3-5 minutes, turning once until golden brown on both sides and cooked through.
Enjoy!
*I know you can freeze meat and use it later, my freezer, however, is a meat graveyard.

Wednesday, October 15, 2008
Ratatouille


We've still been getting summer veggies from the CSA, which usually include eggplant, peppers, zucchini and tomatoes. What to do with these? Our friend Pam shared this delicious ratatouille recipe.
Ingredients:
1 1/2 lbs. eggplant, peeled if thick-skinned
1 green pepper (or 2)
2-3 large zucchinis
1/3 c. salad oil
1 c. sliced onion
1/3 c. tomato sauce
1/4 t. salt
1 t. thyme
1 clove garlic, minced
3 T. flour
28-oz can whole tomatoes, drained
1 lb jack cheese
Slice eggplant, zucchini, and pepper into thin, circular slices. Saute onion in a bit of oil until cooked but not brown. Add garlic for about 1 minute. Stir in oil, tomato sauce, salt, thyme, garlic, and flour and cook just a bit until it makes a thick sauce. Add drained tomatoes and cook until incorporated into the sauce. Break up the tomatoes while they are in the pan.
Layer in a 13x9 inch glass baking dish: first, 1/2 of the tomato sauce, then 1/2 of the eggplant to cover an entire layer, then 1/2 the zucchini to cover the entire layer, then 1/2 the pepper scattered around. Then put half the cheese and repeat with sauce, eggplant, zucchini, pepper, and cheese on top. You can sprinkle some Parmesan on top of the jack to add a little extra flavor as well.
Bake at 400 for 50 minutes. At 40 minutes, cover lightly with a sheet of foil to prevent burning. Enjoy with bread or served over rice. Makes about 4 servings.
Sorry, I forgot to take a picture after it was baked!
Acorn and Rock Soup
You take some rocks from the yard and some acorns that fell from the oak tree. Get a bowl from your play kitchen and put them in. Stir it with a spoon and squish some crunchy leaves inside, pick a little rosemary from the garden. Shake a lot of pretend cinnamon on top and put it in the pretend microwave. Stir it and stir it and stir it.


Thursday, October 9, 2008
Chocolate Gooey Butter Cookies
 Paula Dean always makes rich and delicious looking dishes. For the same party, I wanted to make a chocolatey dessert. I wanted to use the free box of Betty Crocker cake mix I had lying around but I didn't really want to make cake. I didn't know what to do.
I was browsing the new Food Network Site (which now has pictures! finally) and I came across this recipe for Chocolate Gooey Butter Cookies. Again, they were really easy, and a big hit! The only thing is that they take a bit of time to sit in the refrigerator because the dough is so unbelievably thick.
Chocolate Gooey Butter Cookies
Ingredients:
1 8oz bar of cream cheese (I used lowfat) at room temperature
1 stick butter, at room temperature
1 egg
1t vanilla extract
1 box pudding in the mix chocolate cake mix (I used Betty Crocker Triple Chocolate)
Confectioners sugar
Directions:
-Preheat the oven to 350 degrees
-Cream together the cream cheese and butter
-Add the egg and extract and beat until mixed
-Add cake mix and mix until just combined
-Cover and refrigerate for 2 hours
-Roll 1 T of dough into a ball and then roll in powdered sugar
-Set 2 inches apart on a cookie tray
-Bake for 12 minutes, the cookies will be moist and gooey
Eat!
Wednesday, October 8, 2008
Cherry Turnovers

I wanted to make something special for a family/church friends party last weekend. I looked through my recipes for a qualifying dessert. Something different was on my mind--and something with a touch of fall.
I finally found a recipe I cut out from Everyday Food last year. The recipe looked easy enough--but it used puff pastry, something I had never worked with before. I found the recipe about six hours before I had to attend the party--and I still had to do the shopping.
It took me two stores to find the puff pastry--and then it was frozen. I was supposed to thaw the pastry for 30-40 minutes before starting and then roll it out into a larger rectangle still folded--but I didn't have time and my rolling pin doesn't respect me. So I skipped that step. The only thing this did was cause the turnovers to be bigger (what's the harm in that?!). Everyone tried to be good and take only half, but they always went back for another one later.
These turnovers were amazing. My original plan was to make some cherry and some apple, but lack of time and interest in a second dessert choice for non-cherry lovers changed my mind. The dessert was easy to make, despite the newness of the puff pastry. I will gladly make these for any party!
Cherry Turnovers
Ingredients:
1 box (17.25oz, 2 sheets) frozen puff pastry (Pepperidge Farm has some near the pie crust in the freezer section)
3T flour, plus more for dusting
1 bag (12oz) frozen cherries (I recommend breaking these down a little with a fork when you mix them with the sugar)
1/3cup sugar
1T lemon juice
1 large egg yolk mixed with 2T water (for egg wash)
2 to 3T Raw sugar (also known as sanding sugar or finishing sugar) *I used raw sugar and I think it made a nice difference in look--use more than you expect
Small bowl of water and pastry brush or small rubber spatula
Directions:
-When you decide to make the recipe, start thawing the puff pastry.
-In a medium bowl combine cherries, flour, granulated sugar, and lemon juice; toss to coat.
-Unfold one sheet of puff pastry on a lightly floured board or table.
-Mix together the yolk and water for the egg wash and set aside
-Preheat the oven to 375
-Cut into 9 equal squares with a sharp knife (really you can cut into any size you want, but this was the easiest for me--just make sure that between the two sheets you end with an even number)
-Mound the cherries into the center of one square leaving a border on each side. Brush the edge with water.
-Cover the first square with another square and press down the edges to stick. Use a floured fork to crimp the edges.
-Set aside on a cookie sheet (you may want to spray this sheet, I lost a little of the pastry to the pan)
-Repeat the process until you have made all the turnovers.
-Brush the tops of the pastry with the egg wash and sprinkle with raw sugar (apparently if you let the egg wash drip too much the pastry won't puff)
-Use a sharp knife to cut 3-4 slits in the top of each
-Bake for 30-40 minutes until golden brown and filling is bubbling
Serve warm, or at room temperature - they are equally as delicious!
Saturday, October 4, 2008
Pasta Sauce in a Bag - New Product
While I was at the store trying to come up with a quick dinner idea that I could make mid-week after 9-11 hour work days, Bertolli's Sauce in a Bag caught my eye. My main problem with jarred pasta sauce or even the kind in the refrigerator section is that there is always way too much of it. I end up with half a jar left that just sits in the fridge.
As a result, I have been leaning on canned tomatoes that have different Italian spices in them--but it just doesn't cut it. It really is the kind of meal that I would only serve to myself if I was in a bind.
Bertolli's Sauce in a bag changed this for me! I got the Summer Tomato and Basil sauce in the bag. It was just about enough for 2. It heats in the microwave (WITHOUT SPLATTERING!) for 90 seconds. I paired the sauce with some light Buitoni refrigerator section 4 cheese ravioli. I also got some garlic breadsticks from the freezer section.
Everything came together in twelve minutes and the dinner was delicious. I thought that th Bertolli Sauce tasted a lot more like homemade than the kind in the jars. It was fresh and flavorful and had a lightness to it.
Monday, September 29, 2008
How to Fix Mac and Cheese
I made some Mac and Cheese on Friday and it was...weird. The recipe was called Cheesy Macaroni and Ham. I omitted the ham, but I should have omitted a couple of other ingredients as well. There were three things added to the dish that made me worried--but I figured that they would all fit together well in the end.
They did not.
The ingredients that worried me were Sour Cream, Nutmeg, and Dijon Mustard.
The Dijon Mustard was a huge flavor in the pasta, and not a very welcome one. The mustard overpowered the cheese! Mustard Pasta is not a taste sensation. Nutmeg was a flavor that I could pick out despite the overpowering mustard and it was a little odd. While apple pie may be served with cheddar cheese, pumpkin never is and the nutmeg brought back memories of pumpkin pie and pumpkin pie with cheese sounds disgusting. The flavor of the sour cream didn't come out nearly as strongly, however, it did add a little bitter aftertaste.
So we ate the dish anyway, but there were mounds of leftovers that I really didn't want to go to waste. I decided to go back to my roots and remembered Grandma Bev's love for no recipes. I decided I would fix the dish if I could.
I pulled out a small casserole and mixed together a little egg and sour cream (I was out of milk and this seemed like a viable solution). I then added a couple scoopfuls of mac and cheese to the casserole. I topped this concoction with a handful of shredded cheddar being sure to fill in any gaps. I added a little bit of shredded mozzarella. Then I put a few thin pats of butter on top and baked for 15 minutes.
The result was a glorious cheesy hot and bubbly mass of golden delicious pasta and cheese easily masking the taste of the disastrous mustard.
Saturday, September 27, 2008
Deep Dish Pizza
Day three was a real test. My commute was a half hour longer because of an accident on the major interchange. I re-routed and took a decidedly round about way home a little farther north than I needed to be. I got home at 7, and I was tired and hungry and I was wishing for Joey to say I didn't have to cook. But he didn't, he told me he'd be right over. And so I kept with my pact and cooked.
After two so-so recipe's from Robin Miller's Quick Fix Meals, I knew that this one had to be delicious. The surprise was that it was delicious and very very easy and quick. This was the perfect meal to make when I was tired, it used hardly any dishes to boot!
The recipe calls for 1 pound of pizza dough, but Pillsbury refrigerated dough comes in at slightly under. Instead of buying two rolls, I decided to just go with one. I knew that I could get 1 pound of dough at Trader Joe's but then I would have to roll it out. Pillsbury dough is pre-rolled. Unfortunately, my roll of Pillsbury dough had a hole in it! This presented a problem in trying to divide it into two--it was far less dough than it should have been. As a result my two perfect pizzas became one perfect pizza and one puny kid sister. Portion-wise it was a good size for me.
Deep Dish Pizza
Ingredients:
1 pound pizza dough
1 14.5 oz can diced tomatoes (I bet the ones with Italian seasoning or garlic would add something)
2 T tomato paste
1 t oregano
salt
1 C mozzerella cheese
2 T parmesan cheese, shredded
Assorted toppings (I used pepperoni and bell peppers)
*Robin suggested picking up assorted chopped veggies from the salad bar--had I gone to the store before the salad bar was closed, I would have jumped on this idea!)
Directions:
-Preheat oven to 450F
-spray two 9 inch round cake pans with cooking spray
-Spread pizza dough (divided in two) evenly over the bottom (the non holey piece was easy as pie to spread)
-In a small bowl mix together tomatoes, tomato paste, and oregano. Add salt to taste.
-With a rubber spatula, spread the sauce over the dough
-Sprinkle both cheeses over the sauce
-Add toppings as desired
-Sprinkle with a little bit of the remaining cheese if desired
-Bake for 10-12 minutes until crust is golden brown and cheese is bubbly
-Let sit for 1-2 minutes allowing cheese to set
*It was easy to get the pizza whole out of the pan but not easy to cut it inside the pan. Try moving the whole pizza to a wooden cutting board and serving it at the table for a rustic look

Friday, September 26, 2008
No Knead Bread
If you haven't heard about the No Knead Bread craze, you haven't been in the food blogger world long enough! No Knead Bread became a phenomenon last year after a New York Times article was published. For the busy,the stay at home mom, or the home office employee, this is just the kind of bread that is hands off enough to make over a two day period but hands on enough to make you feel accomplished.
I have made the bread several times and each time I think that it would be even better with the addition of rosemary--but then by the time I get to the stage where I would add in the rosemary, I completely forget. Next time I will remember!
I made the bread the other day in a shortened period of time and it still turned out delicious. I had the day at home, so I thought I'd give it a shot and if it didn't work out I'd just make something different as a side for the potato soup I was making. The only thing that didn't work out was that I forgot to flour or grease the bottom of the pot I made it in and as a result the entire bottom half of the bread was impossible to extract. Luckily, I was able to salvage much of the loaf and the rest dislodged during a hot water spa soak in the sink.
I use Jaden's directions because she does it in pictures so it is easy to follow. Also, it really shows you just how the bread should look on each stage. The best part about this was that when I made it in half the time yesterday, I compared mine with hers to determine its state of readiness. I think my bread was a little flatter because of the small amount of time I let it rise, but it still tasted great!
Ingredients:
3 cups bread flour
1/4 teaspoon instant yeast
3/4 tablespoon kosher salt
1 1/2 cups warm water
Covered pot (five-quart or larger cast iron, Pyrex, ceramic, enamel…something that can go into a 450F oven.)
Directions:
-Mix all the ingredients together in a large bowl
-Cover in plastic wrap and set aside on the counter for 12-20 hours or overnight (I set it aside for 8 hours)
-Later, remove dough from bowl and place on a floured surface, form into a ball folding in all sides (this is where I would add the rosemary had I remembered it)
-Flour a cotton dishtowel and place bread on towel and cover. If you put the towel in a pot, the bread will shape like the pot, if you put it on the counter it will be flatter. Let sit for 2 hours (I did 1 hour).
-With 1/2 hour left in resting time, put pot in oven (without the bread) and heat to 450. Remove the hot pot and add bread (GREASE AND FLOUR THE PAN FIRST).
-Bake covered for 30 minutes
-Remove the cover and bake for an additional 12-15 minutes until golden brown
-Cool on a wire rack, the bread will crackle as it cools, serve the same day, I have not found this bread to be as delicious the next day.

Thursday, September 25, 2008
Cheddar Potato Soup
Well, night two came and went. I made Cheesy Potato Soup from Robin Miller's Quick Fix Meals. I must admit right off the bat that I made a possibly major mistake right off the bat that might have ruined the soup.
Remember those tests in grade school where each question told you to do some kind of silly thing but at the top it said Read through all the questions first and somewhere near the bottom it said "don't do numbers 2-20?" Well this is one of those times when I would have failed that test.
The part I didn't read was the part where it says "Carefully, without burning yourself, puree the soup in a blender or food processor or use an immersion blender to do it right in the pot." This is an important piece because, while there are 3 choices of small appliances, I don't have any of them. Usually when I make a blender-required recipe, I just ask Joey to bring one of the appliances over. But he was already there and so was our friend, so I decided to just skip that step.
Big Mistake. Instead of pureeing, I mashed the potatoes and then mixed them with the broth. The soup tasted much like a baked potato. Joey and Nate added butter and more cheese to their soup--bacon would have been an excellent topper. The soup was missing something--I really expected it to be more creamy than baked potato-y. I challenge one of you to try it and puree it and tell me what it's really like!
Cheddar Potato Soup
Ingredients:
2 T olive oil
2 leeks (I didn't realize that 2 leeks was two stalks so I only bought one and then I used finely chopped red onion to fill the void of the other one)
2 large potatoes, peeled and diced
6 cups reduced-sodium chicken broth (she calls for roasted garlic chicken broth which I have seen in other recipes but NEVER in the store)
2 bay leaves
2 cloves garlic, chopped (I added this because I thought there would be no flavor, the garlic flavor did not come through at all)
1 C shredded cheddar cheese
salt and pepper
chopped chives (optional)
crumbled bacon (optional)
extra cheese (optional)
Directions:
-Heat oil in a large saucepan over med. heat
-Add leeks and cook, stirring until soft and fragrant, add garlic and cook one minute more
-Add potatoes, chicken broth, bay leaves and bring to a boil
-Boil partially covered 8-10 min until potatoes are fork tender
-Remove bay leaves
-Puree soup in batches and return to pot
-Add cheese and stir until melted
-Add salt and pepper
-Serve hot with toppings

Wednesday, September 24, 2008
Roasted Sweet Potato
Remember when I told you that my mom sent me a giant sweet potato for my birthday and instead of cooking it it grew? Well I decided enough was enough, my mom is on her way to town next week and I'm sure she'd be hurt to see that I never used the potato she sent me mid-July. So I decided to cook it up.
I cooked it two nights ago to go along with the Chicken Tenders and Corn. I knew that I'd be the only one eating the potato, but really, it was time. Speaking of time, I didn't have it on my side so I wanted to make something quicker than a baked sweet potato but still with the sweetness one might have at Outback.
I scoured the internet for a recipe with these key words "Diced baked sweet potato." I realized I probably should have gone with cubed, but I found what I was looking for on a site I have never before heard of. I changed the recipe a bit because of the other recipe I was making and because I wanted something just a tad sweeter.
Roasted Sweet Potatoes
2 large sweet potatoes (I used only my giant)
3 T olive oil
1 t salt
1 t nutmeg
1/4 t pepper
3 T brown sugar
Preheat oven to 400
Cut the sweet potato into cubes
Combine the nutmeg, salt and pepper
Lay the potatoes in one layer on a baking sheet and toss with olive oil and spices
Bake for 20 minutes or until tender
Move to a bowl and sprinkle with brown sugar
Microwave for 1 minute until brown sugar starts to melt
Serve warm

Tuesday, September 23, 2008
Orangey Oat and Herb Crusted Chicken Tenders
When I visited Chicago last, my Aunt Dean gave me her copy of a cookbook by Robin Miller that has ideas of what to buy, cook, and then cook again a different way. It also has a variety of quick recipes that are kid-friendly. I'm not saying that my fiance is a child, but child-friendly food is definitely the way to go.
This week, I decided to do something that millions of families across the world do regularly and rarely even think about it. I plan to make dinner at home every night and bring my lunch to the office every day. Of course, I bring my lunch all the time anyway, but I don't cook nightly.
Sunday night I went to the grocery store and bought the ingredients for 5 recipes--all from Robin Miller's book. Last night was recipe number 1. It was O.K., I have definitely had some chicken tenders that were better, and I might not even count them as chicken tenders--but they were edible and mostly eaten by both my fiance and I. And, they had a ton of flavor. Plus, it only took me about 30 minutes to put together in total!
The main problem was that the crust wasn't all over the chicken--it was just dotted in places. I had a lot of trouble spreading the orange marmelade. I think if I were to make them again I would try apricot jam but also I would heat the jam slightly and use it to dip or coat the chicken before shaking it around with the oats. Also, there were not nearly enough oats for the whole 1 and 1/4 pound of chicken--so I recommend adding more, or doing the shake up with half and then the other half later.
Orangey Oat and Herb Crusted Chicken Tenders by Robin Miller
Ingredients
1/2 cup quick cooking oats
2 T flour
1 t dried oregano
1 t dried thyme
1 t garlic powder
1/2 t onion powder
1/2 t salt
1/4 t freshly ground black pepper
1 1/4 pounds chicken tenders
1/3 c orange marmalade
Cooking Spray
Preheat oven to 400F
Coat a large baking sheet with cooking spray
In a large ziptop plastic bag, combine ingredients through pepper. Close the bag and shake until combined.
Brush the chicken pieces all over with marmalade - this was hard so I recommend heating the jam
Add chicken to the oat mixture (half at a time) seal the bag and shake to coat.
Place chicken pieces on the prepared baking sheet and spray the tops with cooking spray.
Bake for 20 minutes until golden brown and cooked through (mine were cooked through but were not golden brown)
Serve with BBQ or Honey for dipping

Tuesday, September 16, 2008
Cold Sesame Pasta Chicken Salad
This recipe is a winner, I have already made twice within a few days. I love the site all recipes because of all the reviews. I found this recipe on all recipes here & it had so many good reviews, I had to try it. Changes I made from original recipe: added peppers (also think matchstick carrots would be another good addition), used penne instead of bow tie (I think you could use any pasta you already have in your pantry), & cut down the oil from 1/2 cup to 1/3 cup.
Also, best to make the day before & let in marinate as the original suggests.


Also, best to make the day before & let in marinate as the original suggests.


Sunday, September 14, 2008
Fresh Veggie Pesto Pasta Salad and Tomato Basil Rice Soup
We've just joined a CSA group, so we get fresh veggies from local farmers each Thursday. I thought it might be stressful to get the veggies and then have to figure out a dish, but it's actually easier than thinking up what to make and then going to the market! We had tons of fresh basil and zucchini, so I made up this recipe.
Fresh Veggie Pesto Pasta Salad
Basil Pesto (from The New Vegitarian Epicure by Anna Thomas)
5 oz. fresh basil leaves (2 C. leaves, packed)
1/2 C pine nuts (I didn't have these so I used raw sunflower seeds instead)
1/2 C grated Parmesan cheese
2 cloves garlic
5 T. fruity green olive oil
salt and fresh-ground pepper to taste
Wash basil leaves in salad spinner and remove large or thick stems. In food processor or blender, combine first 4 ingredients and process until nuts and garlic are finely chopped. Add the olive oil and process again, scraping down sides of container as necessary until you have a paste of the consistency you like. Add salt and fresh-ground pepper to taste.
Veggie Pesto Pasta
Pasta (any kind you like - I used ziti cut)
2-3 zucchini or yellow squash, chopped
1-2 carrots, diced
1 large fresh tomato, diced (don't saute!)
Basil pesto to taste
Cook the pasta according to package directions. In a little olive oil, saute squash and carrots along with any other vegetables that you're inspired to use. When pasta is cooked, drain and return to pan. Mix in sauteed veggies and diced tomato. Mix in as much pesto as you like. Serve warm or cold, but it is especially good warm! Serves about 4. (I used a yellow tomato cuz that's what I had but it would look pretty with red!)

I LOVE Anna Thomas' book, The New Vegetarian Epicure. Anna lives in Ojai and wrote one of the original vegetarian cookbooks, The Vegetarian Epicure, in the 70s. She told me the other day that she's working on a soup cookbook and I can't wait! The great thing about this cookbook is that the recipes are seasonal, so you can always find something to make with the freshest veggies available. Here's a delicious - and easy! - tomato soup recipe that comes from her book:
Summer Tomato Soup
by Anna Thomas
4 lbs. ripe, red tomatoes
2 T. virgin olive oil
1/2 onion, finely chopped
3-4 cloves garlic, finely chopped
1 t. salt, more to taste
handful of fresh basil leaves, chopped
2 C vegetable broth
2 C cooked rice (white or brown, but brown is amazing in this!)
fresh-ground pepper to taste
Scald tomatoes in boiling water for 45 seconds. Remove and peel them and trim off their stems ends. Cut in halves or in quarters and process briefly in blender; they should be somewhere between chopped and pureed.
Heat the olive oi in a large, non-stick saute pan and stir the chopped onion in it over a medium flame for about 3 minutes. Add the garlic and saute another 2-3 minutes.
Add the pureed tomatoes, a teaspoon of salt, and the basil. Simmer for about 1/2 hour, until the tomatoes are reduced to a sauce and dark red. Add the vegetable broth and the rice, and bring back to a simmer. Taste, and correct the seasoning if necessary with a touch more salt or a little fresh-ground pepper.
Serves about 5

Monday, September 8, 2008
Braised Chicken with Dried Plums
Everyday Food magazine has a lot of great ideas for quick meals. I scour the magazine every month and dog-ear pages...and then I file it away without making anything. I don't know why this is, but it happens a lot. This month, I decided to hunker down and do some cooking.
On Tuesday night I went to the grocery store with my magazine in hand and bought all the things I needed to make the braised chicken recipe. This recipe calls for wine which usually stops me dead in my tracks. Beer and wine are not my forte. When a recipe says "dry white wine" I think, how could wine be dry? It's a liquid. When a recipe calls for an light but robust beer, I stare at the section long and hard in deep confusion.
However, Everyday Food didn't let me down this time. Someone must have asked them for a wine feature because not only did they do a Wine Basics section but also recommended a type of wine to use in this recipe - Sauvignon Blanc. That said, it still took me remarkably long to find this wine in a reasonable size. I finally decided on the cheapest one I saw with a brand name I recognized -Sutter Home, $3.33 on sale.
The recipe calls for dried plums at the end. If you don't like dried plums, also known as prunes (which makes them sound particularly disgusting) you can use any kind of larger dried fruit that you like--for example apricots. You could probably omit the fruit too and just serve non-dried fruit on the side. I only liked it because it added texture.
I served this with store-bought mashed potatoes from the refrigerator section. This would be good also with polenta (their suggestion) or mashed rutabaga and potatoes. It needs something though to "soak up the rich sauce."
This recipe was absolutely delicious and ridiculously easy to make. I highly recommend it.
Braised Chicken with Dried Plums
INGREDIENTS:
2 T. Olive oil
8 bone-in skinless chicken thighs (about 3 pounds) - my supermarket did not have skinless thighs so I just removed the skin prior to making the recipe
salt and pepper
1 medium onion, chopped
1 T flour
2 C dry white wine SUCH AS Sauvignon Blanc
1 cup pitted dried plums
DIRECTIONS
1. In a heavy 5 quart (or bigger and you can do just one batch) Dutch oven or heavy pot with lid heat oil over med-high. Season chicken with salt and pepper (be generous on the salt). Cook in two batches until browned 6-8 minutes turning once (be careful, the oil spits). Transfer to plate.
2. TO pot add onion and salt and pepper. Cook stirring until onion begins to brown 3-5 minutes (reduce heat if it cooks too fast). Add flour, cook stirring 1 minute. Add wine and chicken along with accumulated juices.
3. Cover and cook until chicken is opaque throughout 8-10 minutes. Stir in dried plums. Serve hot with sauce over mashed potatoes.
I took a bite before I remembered that I needed a picture.

Tuesday, September 2, 2008
Italian Sausage Lasagna
One of my great aunt's sent me Ina Garten's Family-style cookbook for my engagement. The book is filled with amazing pictures and, if you have ever watched Ina before, you recognize Ina's banter in the notes section. The first recipe I tried from the book was Ina's Italian Sausage Lasagna. We had a couple of friends over and served them the dish and it was a huge hit! Ever since I made it the first time, Joey has been asking me to make it again.
So last night we invited a few people over and made it again. The recipe is a little time consuming in the preparation, so I refuse to make it on a weeknight, but it is well worth the trouble.
Ina's recipe can be found in the book or here, but I'll rewrite it anyway for ease.
Italian Sausage Lasagna
INGREDIENTS:
Sauce
2 tablespoons olive oil
1 cup chopped yellow onion (1 medium onion)
2 garlic cloves, minced
1 1/2 pounds sweet Italian turkey sausage, casings removed, broken up into chunks with 2 forks
1 (28-ounce) can crushed tomatoes in tomato puree
1 (6-ounce) can tomato paste
2T chopped fresh flat-leaf parsley
1/2 cup chopped fresh basil leaves
1/2 t Kosher salt
1/4 t black pepper
Cheese Mixture
15 ounces ricotta cheese
2 T parsley, chopped
3 to 4 ounces creamy goat cheese, crumbled
1 cup grated Parmesan
1 extra-large egg, lightly beaten
1/2 t Kosher salt
1/4 t black pepper
Other
1/2 pound lasagna noodles (~10)
1 pound fresh mozzarella, thinly sliced
1/4 cup grated Parmesan
DIRECTIONS:
1. Preheat oven to 400 degrees
2. Heat olive oil in a large skillet or pan over medium low heat (I used a large dutch oven because last time it splattered all over the stove) add onions and cook for 5 minutes until translucent
3. Add garlic and cook for one minute more. Add Italian sausage and cook for 8-10 minutes until no longer pink
4. Add the tomatoes, tomato paste, parsley, basil, salt and pepper and simmer over med-low heat for 15-20 minutes until thickened.
5. Meanwhile, fill a large bowl with the hottest tap water and soak the noodles for 20 minutes
6. In a medium bowl, combine all the ingredients for the cheese mixture. Set aside.
7. Ladle 1/3 of the sauce into a 9x13 baking dish (I use glass). Spread evenly across the bottom and then layer with half the pasta, half the mozzarella, half the cheese mixture and 1/3 of the sauce. Top in the same way with the rest and finish with sauce.
8. Sprinkle 1/4 cup of Parmesan over the top.
9. Bake at 400 degrees for 30 minutes until the sauce is bubbling. Let cool for 10-15 minutes before serving. Serve with garlic bread and salad.

Monday, September 1, 2008
Applesauce Cake
I don't like those little individual servings of applesauce. I don't like them because they are so watery. So when I'm jonsing for some applesauce, I have to buy the big jar. Then I eat a little of it and that's enough and I don't know what to do with the rest.
I read somewhere that you could use applesauce in place of oil in any cake. But how often do you make cake? Then I had it, autumn is eminent, why not make an applesauce cake? I used Google Blog Search to find a recipe and came up with a golden ticket. As luck would have it, I had some extra buttermilk lying around too!
Unfortunately, I made an error in cooking time..or perhaps there is a misprint in the recipe? Either way, this is what happened. I cooked th cake in an 8x8 glass cake pan for the listed time, I tested it with a toothpick and it came out clean. I let the cake cool. Late into the evening--around 11, I decided to cut the cake into squares so that I could bring it to work and not eat it all myself. The edges were done, but unfortunately, the middle was not. It was completely raw, but it had been cooling for so long. I salvaged the edges and the bottom and threw the remainder away.
Ingredients:
2 cups flour
1 tsp. baking soda
1 tsp. cinnamon
½ tsp. allspice
½ tsp. nutmeg
¼ tsp. ground cloves
½ tsp. salt
½ cup butter, softened
1 cup sugar
3 eggs
½ tsp. vanilla
1 cup applesauce
¼ cup buttermilk
Directions:
1. Preheat the oven to 375 degrees. Grease and flour the bottom of an 8x8 pan (next time I will use 2 regular circle pans)
2. Sift together the first seven ingredients
3. Beat together butter and sugar until fluffy.
4. Add eggs one at a time. Add vanilla and applesauce.
5. The mixture at this point is very wet. Alternate flour mixture and buttermilk with the mixer at very low speed. Be sure to start and end with flour.
6. Bake at 375 for 25-30 minutes until toothpick comes out clean.
This was a big hit at the office. Thanks for the recipe, Kristen!

Sunday, August 31, 2008
Karen's Amazing Chocolate Caramel Dessert
My friend Allison's sister Karen sent Allison a care package for her birthday back in July. In it were these amazing chocolate caramel dessert bars. Allison shared her bounty with me--I probably had eight of the delicious little morsels. I asked for the recipe straight away.
The recipe, while it looks easy--actually happened to be a little bit difficult. The problem was that I might possibly have not split the batter into two parts. Someone who has made these before recommended taking the second half of the batter and stretching it across the top with your hands because once it is down, it sticks and is impossible to move.
Karen's Amazing Chocolate Caramel Dessert
INGREDIENTS:
-1 package yellow cake mix
-2/3 C evaporated milk, divided
-1 1/2 sticks butter (melted)
-~55 caramels
-1 C chocolate chips (I used the mini ones and this turned out to be easier to spread)
DIRECTIONS:
1. Preheat oven to 350. Grease and flour the bottom of a 9x13 pan.
2. Mix yellow cake mix, melted butter, and 1/3C evaporated milk
3. Take 1/2 of the mix and cover the bottom of cake pan, spread evenly with a rubber spatula (it turns out these are mostly made with silicon now)
4. Bake for 10 minutes.
5. Meanwhile, ombine caramels and 1/3 C evaporated milk and melt in microwave until melted (~4min)
6. Pour the caramel mixture over the bottom crust.
7. Evenly sprinkle the chocolate chips over caramel.
8. Cover with remaining cake mix (this is very hard, see above notes
9. Bake an additional 15-20 minutes
Allow to cool completely before trying to cut. Once cut, nobody noticed that the top was missing. I didn't have any left by the end, they go like hotcakes.

Thursday, August 28, 2008
Lemon Pasta
While I did not taste or even see this dish, I entered the house shortly after it was cooked and it smelled absolutely delicious. Jenny has taken to listening to a particular podcast recently called The Splendid Table. The podcast discusses a variety of food topics but Jenny's favorite part is when the leader of the cast answers questions from people who called in.
Recently, a lady called in about a taste she was craving after a recent trip to Italy. There they had pasta with a Lemon Sauce. The speaker questioned the lady about the sauce and gave her ideas of how to recreate it at home. Jenny is a big fan of Lemon Pasta and decided to make the dish herself after hearing what sounded like a simple recipe. The recipe doesn't have measurements and can easily be adjusted to taste.
And simple it was (and delicious to boot!)
Ingredients:
Directions:
Recently, a lady called in about a taste she was craving after a recent trip to Italy. There they had pasta with a Lemon Sauce. The speaker questioned the lady about the sauce and gave her ideas of how to recreate it at home. Jenny is a big fan of Lemon Pasta and decided to make the dish herself after hearing what sounded like a simple recipe. The recipe doesn't have measurements and can easily be adjusted to taste.
And simple it was (and delicious to boot!)
Ingredients:
- Olive Oil
- 1 Lemon
- 3-4 cloves of garlic
- Coarse salt
- Ground pepper
- Fettuccine
Directions:
1. Place a generous amount of olive oil in a skillet, coating the bottom of the pan. Place the zest of an entire lemon in with the oil, along with 3-4 cloves of garlic, cut up in petals. Sauté over medium heat with salt and pepper to taste.
2. Boil fettuccine in heavily salted water. A minute or two before you are to drain the pasta, take 1/2 c. of the pasta water and place in the oil mixture. Stir in and let cook, to thicken oil mixture.
3. Drain pasta. Place in skillet and toss with oil mixture.
4. Remove from heat. Pour in juice from lemon onto pasta. Toss. Garnish with Parmesan cheese.
Tuesday, August 26, 2008
Fresh Mozzarella Salad w/ Avocado & Roasted Corn
I love fresh mozzarella. Here is where I found this recipe. Of course the original calls for tomatoes which I omitted, also, it called to lay on a bed of greens & I decided it was already a large amount, so I skipped that as well. The colder the better...we had some left over from dinner last night which I ate for lunch today & I liked it better really cold. Next time, I will make in advance & cut the avocados up right before I serve so they don't brown.


Friday, August 22, 2008
Needed: Banana Recipe
As I was leaving the store today I noticed a cart with bags full of Banana's for 99 Cents (5 bunches for 99 cents you only see 4 below long story short...locked my keys in the car...best neighbor in the world came for Me & Julia...shared my bargin with her).
Now what am I going to do with all these bananas???? Any thoughts?

Now what am I going to do with all these bananas???? Any thoughts?

Wednesday, August 20, 2008
Cold Green Bean Salad with Tarragon Dressing
I was trying to find a green bean recipe that was similar to the one Aunt Gail made for the reunion...this wasn't it, but, it was very good. I omited quite a few of the ingredients from the original recipe I found & changed it from a 2 bean salad to a 1. Here is the link.


Tuesday, August 19, 2008
The Great Squash
My mom sent me vegetables from the family farm in Indiana--through the mail all the way to California for my birthday. She said she wanted to know how far they could travel. She sent me a sweet potato and she sent me a squash which I mis-identified initially as a yellow zucchini.
The yellow vegetable arrived in not quite ship-shape condition in case you are planning to send vegetables across the country to your relatives. It was wrapped in a wet paper towel inside a ziploc bag and the very end had to go right away--the rest though was fine. It made the box smell like farm water--and if you've had the opportunity to smell farm water before, you know it's a little putrid. The sweet potato looked as though it had been just picked and filled up the box, but that's a different story.
I'm not a big squash fan. I couldn't think of many family recipes in which squash was a factor. I hemmed and hawed. Finally I decided to make this. I bought all the ingredients and then I put it off. I didn't make it and the squash sat. Finally I told myself that this squash was ready to be eaten and I was going to do it, no matter what.
So I hunkered down and decided against the ribbons (I'm not a fan of the vegetable peeler). I cut up the squash into discs. I cut up part of the red onion into little pieces. I cut up a green pepper that might be sweet--but might also be spicy--I don't remember. I cut up a little bit of sweet yellow pepper. And I cut up a little tiny spicy pepper that I got for something else--and I don't know what it is or what the spice content was--but it's pretty.
I sauteed the onion in a little bit of olive oil for a little and when it got fragrant I added the remaining ingredients and sauteed some more. I added a little salt, a little pepper, a little Jamacian Jerk Seasoning (I'm more aware of the Jamacians than usual because of the Olympics!) And when I could see a little browning and smell the squash I decided it was done--the only thing worse than squash is squishy squash.
The verdict? A pretty good vegetable stir-fry.

Monday, August 18, 2008
How to Grow a Sweet Potato
 My mom sent me a sweet potato for my birthday. I am still contemplating my strategy for it. I think I will bake it and then consume it over two meals with honey-butter or cinnamon
  butter or butter and brown sugar. I think I will make it tonight and let you know. In the meantime, you can check out how much it has grown just sitting by itself with no sun or water alternating between seats on my table and microwave. How does it do it? I wish I knew the secret combination so that I could grow other things. Unfortunately, my green thumb is usually not so green--this is the most accomplished growing that I have ever seen pass over these hands!
Monday, August 11, 2008
The Taste Sensation
Last night Joey and I decided on a whim to make some cheesecake. Philedelphia cream cheese has this great interactive program on their site (the Kraft site) called the Cheesecake Customizer where you can choose exactly what you want to do and it will provide you with a recipe. Joey and I used the customizer and came up with an oven baked chocolate cheesecake with a white chocolate swirl.
We went to the store and got all the ingredients. We started mixing with the Kitchenaid mixer I have and I thought it was working, but it turns out, that for cheesecake, you should use an electric hand mixer if possible because it can get at the bottom of the mix and really bite through the thickness. We didn't know that there were un-mixed-in white chunks until we started pouring the mixture into the purchased chocolate graham cracker crust.
Knowing that over mixing after the egg is added creates cracks, we decided to pour the overly thick cream cheese mixture back into the bowl and remix. We tipped the crust over the pan and--whoopsie-daisy! The entire crust fell out of the pan into the bowl.
Totally unexpected.
We decided to do another mix and make the cheesecake anyway without the crust. This crustless cake is delicious! It is a Taste Sensation. It remindes me a little bit of cheesecake brownies. The edges got a little overcooked but the inside was delicious--I think this could easily be solved by cooking it less time (but that didn't occur to me at the time)
Ingredients:
1 Pre-made chocolate cookie crust (not oreos, but more like chocolate graham crackers)
1 8oz package cream cheese
1 8oz package neufchatel cheese (1/3 less fat cream cheese)
1/2 cup sour cream
2 eggs
3 squares (3oz) semi-sweet baking chocolate, melted
2 squares (2oz) white baking chocolate, melted
1 tsp. vanilla
Directions:
1. Preheat oven to 325° and prepare crust (take it out of the wrapper)
2. Beat cream cheese, sugar, and vanilla in a large bowl (I recommend a hand mixer) until well blended
3. Add the chocolate and sour cream until mixed together.
4. Add the eggs, one at a time and beat until JUST COMBINED to avoid cracks (only applicable if you are making real cheesecake and NOT the Taste Sensation)
5. Dump crust over bowl and beat once more until combined.
6. Evenly spread mixture into a 8-9 inch circle cake pan
7. Gently drop spoonfulls of white choclate over the batter and cut through batter with knife for a marble effect.
8. Bake 25 minutes (do less) until center is almost set
9. Cool completely, then chill for at least 4 hours.

Sunday, August 10, 2008
German Apple Pancake
This month's cooking light came in the mail and made my mouth water at first glance. On the cover was a German Apple Pancake, and "light" to boot! I immediately bought the ingredients to make it. And then I didn't. But yesterday, I woke up unusually early, and decided it was time.
So, I bought the ingredients but I refuse to buy things that I can only use for the one recipe. This recipe, in an effort to make it "light" I guess, called for egg substitute. I bought regular eggs--I planned to use the remaining eggs in an ice cream recipe. The problem that I ran into was my failure to look up how many eggs = 1 cup of egg substitute. Well actually, I did look it up, but then I didn't follow the directions based on what I learned. I learned that 1/4 cup of egg substitute equals 1 egg. Then I continued to use only 2 eggs. I'm not sure what was going through my head except for maybe "4 eggs is a whole lot of eggs." So I used 2. This caused my German pancake to be really thin and not quite as custardy as promised. However, it was still delicious and I would make it again in second (and I would likely try it with 4 eggs).
Recipe below found in the Cooking Light August 2008 as well as online here.
1/2 cup flour
1/2 teaspoon baking powder
1 tablespoon sugar
1/8 teaspoon salt
1/8 teaspoon nutmeg
1 cup egg substitute (or 4 eggs)
1 cup milk (low-fat if you want to be 'healthy')
2 tablespoons butter, melted
1 teaspoon vanilla extract
Apple mixture:
Cooking spray
1/2 cup granulated sugar, divided
1/2 teaspoon ground cinnamon
1/2 teaspoon nutmeg
1 cup thinly sliced Granny Smith apple
Remaining ingredient:
1 tablespoon powdered sugar
Directions:
1. Mix together the dry batter ingredients in a large bowl using a whisk. In a separate bowl mix together the wet ingredients. Pour the wet ingredients into the dry and stir with a whisk until just combined. Let sit 30 minutes.
2. Meanwhile, spray ovenproof pan with cooking spray on the bottom and the sides. Mix together 1/4 sugar, cinnamon and nutmeg in a small bowl. Sprinkle sugar mixture over the sides and bottom of prepared pan. Preheat oven to 425 degrees.
3. Slice apples into thin slices and place in a windmill single layer over the sugar mixture. Sprinkle remaining 1/4 of sugar over the apples. Heat over medium heat until mixture bubbles (they say 8 minutes, I say 4-5). Remove from heat and pour the batter over the top.
4. Bake at 425 for 15 minutes. Reduce heat to 375 for 13 minutes more (don't take the pancake out). Remove pan from oven and transfer to plate (or just cut it from the pan). Sprinkle powdered sugar over the top and enjoy.
I think this pancake could be used for dessert but I enjoyed it for breakfast. I realize it has apples in it, but I think it would be delicious served with some fresh raspberries.

So, I bought the ingredients but I refuse to buy things that I can only use for the one recipe. This recipe, in an effort to make it "light" I guess, called for egg substitute. I bought regular eggs--I planned to use the remaining eggs in an ice cream recipe. The problem that I ran into was my failure to look up how many eggs = 1 cup of egg substitute. Well actually, I did look it up, but then I didn't follow the directions based on what I learned. I learned that 1/4 cup of egg substitute equals 1 egg. Then I continued to use only 2 eggs. I'm not sure what was going through my head except for maybe "4 eggs is a whole lot of eggs." So I used 2. This caused my German pancake to be really thin and not quite as custardy as promised. However, it was still delicious and I would make it again in second (and I would likely try it with 4 eggs).
Recipe below found in the Cooking Light August 2008 as well as online here.
Ingredients
Batter:1/2 cup flour
1/2 teaspoon baking powder
1 tablespoon sugar
1/8 teaspoon salt
1/8 teaspoon nutmeg
1 cup egg substitute (or 4 eggs)
1 cup milk (low-fat if you want to be 'healthy')
2 tablespoons butter, melted
1 teaspoon vanilla extract
Apple mixture:
Cooking spray
1/2 cup granulated sugar, divided
1/2 teaspoon ground cinnamon
1/2 teaspoon nutmeg
1 cup thinly sliced Granny Smith apple
Remaining ingredient:
1 tablespoon powdered sugar
Directions:
1. Mix together the dry batter ingredients in a large bowl using a whisk. In a separate bowl mix together the wet ingredients. Pour the wet ingredients into the dry and stir with a whisk until just combined. Let sit 30 minutes.
2. Meanwhile, spray ovenproof pan with cooking spray on the bottom and the sides. Mix together 1/4 sugar, cinnamon and nutmeg in a small bowl. Sprinkle sugar mixture over the sides and bottom of prepared pan. Preheat oven to 425 degrees.
3. Slice apples into thin slices and place in a windmill single layer over the sugar mixture. Sprinkle remaining 1/4 of sugar over the apples. Heat over medium heat until mixture bubbles (they say 8 minutes, I say 4-5). Remove from heat and pour the batter over the top.
4. Bake at 425 for 15 minutes. Reduce heat to 375 for 13 minutes more (don't take the pancake out). Remove pan from oven and transfer to plate (or just cut it from the pan). Sprinkle powdered sugar over the top and enjoy.
I think this pancake could be used for dessert but I enjoyed it for breakfast. I realize it has apples in it, but I think it would be delicious served with some fresh raspberries.

Subscribe to:
Posts (Atom)
