Wednesday, July 30, 2008
Crock Pot Roasted Chicken and Vegetables
I scoured the web for a roasted chicken recipe for the crock pot and came up short. Everything I found was for just unflavored chicken. I was concerned because a lot of times I make a recipe for the crock pot it comes out lacking flavor. So, I decided to make it up instead.
Last night, I cut up some parsnips, carrots, and onions into bite sized pieces. I put them in a gallon size ziploc bag with some Lawry's seasoning salt, Thyme and garlic as well as a sprig of rosemary and set them in the refrigerator overnight.
I also dressed the chicken (just like Amelia Bedelia) with some salt, pepper, thyme, rosemary and garlic. I put the garlic in the cavity and removed the other stuff that was in there. However, I was pretty grossed out dealing with the whole chicken. It was a little close to real life animal for me. I had this same problem once when I needed boneless pork shoulder but was distracted by the low price of boned pork shoulder (called Pork Arm Picnic--which should have stopped me immediately)--the thing that was worse about that was that you could feel the joints. Disgusting. So, I had a lot of trouble with the chicken, but I manged to dress it and then put it on a plate in the fridge overnight covered with foil.
I have to leave for work before 7 in order to get there with the shortest possible commute in minutes. I leave myself 30 minutes to get ready and leave in the morning. Because I did most of the preperation last night, I was able to prepare the pot in just 7 minutes, set it to cook, and still leave before 7. Impressive, I know.
I used the probe feature on my crock pot for the first time and I was a little worried about it. I read the Betty Crocker cookbook basics about cooking a whole chicken in the oven. I learned that it has to be 180 degrees to be fully cooked in the thickest part of the thigh. This is where they lost me. I know what a chicken thigh is, but when I looked at the bird sitting there, I couldn't really determine where the thigh was. I guessed, and apparently I got it right. Phew. The probe switches the crock to Warm after it reaches the tempurtare inputed in the morning.
The chicken turned out to be flavorful and delicious except the breast part was a tad dry (but I don't usually like the breast part in general, it was pretty much as dry as any chicken breast is usually). The vegetables, while fully cooked were tasteless, I don't know how to fix that though, so we just salted them.
Crock Pot Roasted Chicken and Vegetables - Served 3 with 1/2 chicken leftover
Ingredients:
1 Whole 5+ pound chicken
1 bag parsnips
4 red potatoes
3 large carrots
1 brown or yellow onion (I made a recipe with a red onion and it didn't hold up at all in the crock)
6 cloves of garlic, papery skins removed
3 sprigs rosemary
salt or lawrys seasoning salt
pepper
dried Thyme
Directions:
1. The night before, remove giblets from chicken and replace with garlic and 2 rosemary sprigs. 2. Sprinkle salt, pepper and thyme on both sides of the chicken, rub in
3. Cut up carrots, onion and parsnips into bite sized chunks--don't cut them too small or they will turn to mush
4. Sprinkle vegetables with salt, pepper, thyme and rosemary and store in a ziploc bag overnight
5. In the morning, spread vegetables on the bottom of the crockpot
6. Place the chicken backside up on top of the vegetables. Shift veggies to be sure that chicken fits in.
7. Insert the probe into the thickest part of the thigh avoiding the bone
8. Set the crockpot to stop cooking once it hits 180 degrees (I can't tell you in hours, but I know I left at 7 and it was at 32 degrees and I arrived home at 6:30 and it was on warm)
9. Serve chicken with vegetables straight from the pot
Thursday, July 24, 2008
The Devil Made Me Do It
It is a dish for which everyone seems to have their own recipe. I even found a website dedicated to the subject (Deviled egg website). I thought it might be interesting to discuss on the blog . . . assuming it is not too old fashioned for all you modern cooks.
Boiling the eggs . . .
For a long time I used to put the eggs in cold water, bring it to a boil, cover the pot, take the pot off the heat and then let it sit for 17 minutes. Now, I use this nifty egg timer device that changes color as the eggs cook.
Cool down the eggs in cold water (to prevent the ugly green ring around the yolks).
Using older eggs makes them easier to peel, but I recently read that adding salt (liberally) to the water makes even really fresh eggs peel easier. I tried it and it does seem to work.
Probably a good idea to make a few extras . . . they don't always peel no matter what you do
Now, people I know add pickle juice (and cut up pickle) and a lot of the recipes call for a little vinegar but I am not tempted. The website indicated a huge variety of ingredients that people use.
Serving them . . .
Well, what else to use but a deviled egg dish (I own two plus a Tupperware holder if transport is needed) but if you don’t have one, a plate will do.
So, do any of you make deviled eggs? If so, what is your recipe?
Tuesday, July 22, 2008
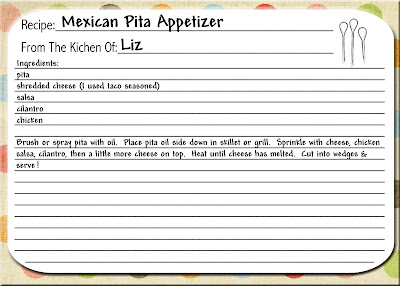
Mexican Pita Appetizer
Click to enlarge:
Meatballs
Click to enlarge:
Monday, July 21, 2008
Grilled Pizza
This is one of four small pizzas that the recipe made -- it was very filling so I had the final piece for lunch the next day (reheated at high temperature in the oven).
Grilled Pizza with Hot Sausage, Grilled Peppers and Onions and Oregano Ricotta (Bobby Flay recipe from Food Network website)
1/2 lb Italian hot sausage
1 large red onion, cut into 1/4 inch thick slices (keep rings together for grilling)
2 large yellow pepper and 2 large red peppers -- cored, seeded and quartered (I actually used 1 orange, 1 red and 2 green peppers)
Olive oil
salt and pepper
1 recipe pizza dough rolled into 4 (6 inch) rounds (I used Pillsbury in a tube and divided into four quarters)
1/2 lb grated fontina cheese
1 cup ricotta
2 T extra-virgin olive oil
2 T chopped fresh oregano
Basil vinaigrette, recipe follows
Preheat a grill. Grill sausage on both sides until golden brown and cooked through, about 10 minutes per side (I actually precook the sausage in water or beer so it takes much less time to cook on grill and tends to stay moister). Brush onions and peppers with the oil and season with salt and pepper. Grill until soft, about 3-4 minutes per side. Remove the sausage from the grill and slice into 1/4 inch thick slices. Remove the onions, separate into rings and roughly chop. Remove the peppers and slice into 1/8 inch thick slices. (My peppers were somewhat charred but that was fine -- they tasted delicious).
Heat grill to high. Brush dough with olive oil, season with salt and pepper and grill for 2-3 minutes or until golden brown. Turn over and grill for 1-2 minutes. Remove from the grill and place on a flat surface. (To get on the grill, I sprayed a piece of foil with cooking spray and then put the pizza dough on it. At the grill I flipped the foil over to get the dough on the grill -- I did have to rearrange the dough slightly but it wasn't a problem)
Divide the fontina cheese among the 4 pizza rounds. Divide the sausage, onions and peppers over the cheese. Place the pizza on the grill, close the cover and grill until the cheese has melted, about 3-4 minutes. (you can finish in the oven, but why??? -- 450 degrees for 5-10 minutes on sheet pan)
Mix together the ricotta, extra-virgin olive oil and oregano in a small bowl and season with salt and pepper to taste. Remove the pizzas from the grill/oven and drizzle with Basil vinaigrette. Top with dollops of the ricotta cheese mixture and let rest for 5 minutes. Slice and serve.
Basil Vinaigrette
1/2 cup fresh basil leaves
1/4 cup white wine vinegar
1 T honey
salt and freshly ground black pepper
1/2 olive oil
Combine all ingredients and blend until smooth. Adjust seasoning with salt and pepper to taste.
Old Fashioned Cucumber Salad
The recipe . . .
2-3 medium cucumbers and 1 T salt
3/4 cup white vinegar (although I have used cider vinegar sometimes)
2 T sugar
1/4 t. pepper
1 medium onion, thinly sliced (optional, but I generally include)
Wash cucumbers. Pat dry and score with tines of folk (or you can peel them if the skin is tough). Cut into transparent, paper-thin slices to measure 4 cups.
Drain cucumber thoroughly and press out remaining liquid. Put cucumbers and onion in container. Stir together vinegar, sugar and pepper; pour over slices. Cover; refrigerate at least 4 hours. Drain cucumbers before serving.
Warm German Potato Salad
In my recipe search, I found this one on the Food Network website (courtesy of Gourmet Magazine) that I really like.
Ingredients
2 lbs small red potatoes, washed well (I use any potatoes I have on hand and don't find it to be a problem -- for the pictured salad, I think they were Yukon Gold)
5 slices bacon, cut crosswise into 1/4 inch strips (about 1/4 lb)
1 medium onion, chopped
1/2 teaspoon sugar
2 T cider vinegar
1/2 cup beef broth
1 1/2 T chopped fresh parsley leaves plus extra for garnish
In a large saucepan combing potatoes with salted water to cover by 1 inch and simmer until just tender, about 20 minutes. Drain potatoes and let stand until cool enough to handle. Cut potatoes into eighths and put into a relatively big bowl. You can cut the potatoes into smaller pieces before cooking to shorten cooking time -- don't overcook since they tend to fall apart to easily.
While potatoes are cooking, in a medium heavy skillet,cook bacon over moderate heat, stirring until browned and crisp and transfer with a slotted spoon to paper towels to drain. Then add to bowl with potatoes. Keep mixture warm, covered (I put a plate over the bowl but I guess plastic wrap or foil would work).Pour off all but 2 T of fat from skillet and saute onion over moderately high heat, stirring, until softened, about 3 minutes. Add sugar, 1 T vinegar and both and simmer 2 minutes. Add onion mixture to warm potatoes with parsley and remaining 1 T vinegar, tossing gently and season with salt and pepper. I tend to stir it (gently) to absorb more of the liquid that falls to the bottom of the bowl after making and before serving. If it doesn't taste tart enough, I will add a little more vinegar.
Serve potato salad warm or at room temperature, garnished with parsley. When I make it ahead of time and refrigerate, I zap it in the microwave to warm it up.
tip: I freeze the left over beef broth in an ice cube tray and transfer to a freezer bag to use the next time I need beef broth.
Saturday, July 19, 2008
Country Style Pork Ribs
That night, we scoured through my selection of slow cooker recipes and finally found just what we were looking for in one of my most helpful books. We chose this recipe because we only needed to buy two additional ingredients to make it! Overall, a very cheap dinner.
We chose Wednesday as the day to cook it up because the most diners were available to partake. My fiance and I knew we didn't need to eat 5 pounds of ribs ourselves, so on Tuesday night I organized all the ingredients and set them out so that before I left for work (by 7am at the latest) I could throw everything together in the crockpot--just set it, and forget it.
All the ingredients besides the meat and the onions were really just to make the sauce to cook it in--a basic bbq sauce. If you want to make this recipe even simpler, forget all the ingredients and just pour 3 cups of your favorite bbq sauce over the meat and onions.
These ribs fell right off the bone when they were done, but all the flavors from the cooking were completely lost, the meat was floating in a dark liquid filled with fat that fell in just like the meat. I didn't serve the liquid in the pot or the onions with the meat, instead, we used the reserved bbq sauce as well as a bottled sauce I had in the fridge to season up our meat. If you expect traditional bbq'd ribs, you'll be disappointed, but if you expect fall off the bone pork, you're in for a treat.
Country Style Pork Ribs
Ingredients:
1 large onion, thickly sliced and separated into rings
2 1/2-3 pounds of pork country style ribs--I used 5.44 pounds, so this might have had an impact on the extreme loss of liquid--I totally forgot to double the recipe as I had planned, but I doubt it made much of a difference
1 1/2C low-sodium V8
1 6oz can tomato paste
1/4 C molasses (my fiance couldn't believe I had this on hand)
3T vinegar
1t dry mustard
1/4t salt
1/4t pepper
1/4t dried thyme
1/4t dried rosemary
Directions:
Line the bottom of your slow cooker (mine is 6qts) with onion rings
Top with meat, cut into large chunks if necessary
Mix all the remaining ingredients together (should yield 4 cups)
Pour 3 cups of sauce over meat
Set the timer for 10-12 hours on the low setting (I did 10 hours)
Forget it.
Does anyone have any ideas of what to do with the leftovers to make a different meal out of it?
Friday, July 18, 2008
Chicken Sausage with Pasta
Chicken Sausage with Pesto Pasta
Ingredients
1 10.5 ounce can of diced tomatoes with Italian seasonings
4 chicken sausages with Pesto, sliced into 1 inch thick circles
1 T Herbs de Provance
1/2 t salt
1/2 t pepper
1/2 box pasta of your choice
Boil water as directed on the box
Mix the herbs, salt and pepper into the can of tomatoes (you can just add them to the can, no need to dirty a bowl)
Add sausage chips and tomato mixture to a nonstick pan and saute over medium heat for 8-10 minutes
Cook pasta in bowling water simultaneously and they will be ready together
Drain pasta
Serve sauce over pasta
Thursday, July 17, 2008
Chocolate Wafer Icebox Cake - Dr. Suess Style
Allison's birthday is on Sunday, so I decided to celebrate on Wednesday, since I had a little extra time to cook the night before.
I followed the recipe from Shutterbean's blog exactly--but I was a little nervous when I compared the whipped cream recipe with the one in my Betty Crocker cookbook. Shutterbean's big batch of whipped cream called for 4 cups of heavy whipping cream, 3 TB of Sugar, and 1 TB of Vanilla. Betty called for only 2 cups of cream and the same proportions of everything else. The bottom of the Nabisco wafer box called for 3 cups of cream and the same proportions of everything else. It was too late to call any of my usual power bakers, so I decided to stick with Shutterbean.
I made a good decision, after whipping the cream, I found it to be delightfully vanilla-y, not too sweet and a perfect compliment to the chocolate cookies. I did learn one thing while whipping the cream though, if one wafer in a box is broken, and the box is sitting on the table with the vibrating mixer, all the cookies will break.
Broken cookies, lend to a not-so-perfect cake. With images of Shutterbean's and then Smitten Kitchen's perfect cakes dancing in my head, mine just didn't quite stack up (pun intended).
Here are some do's and don'ts to keep in mind when you make this dessert, and I say when because you will want to rush out and get those $4 wafer boxes immediately and make this cake.
- Do whip the cream enough for soft peaks
- Do refrigerate the cream, and possibly even the cake every once in a while if your kitchen is over 75 degrees
- Do select boxes of cookies that are not broken
- Do not leave cookies anywhere they could get damaged
- Do put a dollop of whipped cream under the first layer of cookies to hold them still
- Do not press down on the layers when you spread whipped cream--this will cause the cookies to push out and unbalance the cake
- In the event of broken cookies, do use them, but try to make a cookie layer as complete as possible
- Do turn the cake around 180 degrees halfway to avoid leaning
Chocolate Wafer Icebox Cake
Ingredients:
4 Cups heavy whipping cream
2 intact boxes of Nabisco chocolate wafer cookies
3T sugar
1T vanilla extract
Directions:
Combine cream, sugar and vanilla in a chilled mixing bowl and beat with electric mixer until soft peaks form. (I wasn't sure what soft peaks were, but basically it becomes thick and spreadable with a surprising fluffy lightness)
Find a flat plate--flate is VERY important, I used my cake carrying case.
Put a dollup of cream on the bottom of seven cookies and arrange them in a circle with one in the middle.
Use a rubber scoop spatula to spread a scoopfull of whipped cream onto the layer of cookies
Continue layering cookies and whipped cream, be sure to end with whipped cream.
Crush leftover cookies between fingers (I rolled broken waffers between my hands and let the crumbs slip through my fingers to decorate the top
Chill for 4-6 hours until cookies are more cakey OR cover with plastic wrap or cake cover and freeze overnight, move to fridge at least 1 hour before serving.
I froze the cake overnight, drove it to work in 70 degree weather, and then popped it in the fridge for the rest of the day. This cake was so delicious. It was creamy and cakey. It was a HUGE hit in the office and the 12 people on my team devoured the cake before they had a chance to share with any of the other 70 people in our immediate area. If you are going somewhere with a crowd of big eaters, you may consider making two cakes.
Wednesday, July 16, 2008
Mac and Cheese - The Individual serving
So, last night, I did a bit of an experiment. Recently, I acquired two small Corningware individual casseroles with lids. They were just the thing for my experiment. I decided to use the leftover noodles I had from dinner to make a revised single-serving version of Grandma's Macaroni and Cheese. I ended up making two single servings because I remembered that I would be celebrating someone's birthday at work and therefore I might as well surprise her with a free lunch.
I was a little worried about the proportions of the dish because I didn't exactly know how to measure it out and when the 9x13 recipe calls for 2 eggs and you are only making 1/4 of the recipe, how can you really split an egg? So, I improvised, and the results were glorious.
Grandma Bev's Mac and Cheese - Individual Servings
Makes 2 Individual Servings
Ingredients:
1/4 C Skim Milk
1 Egg
1/4 C (or more) Extra Sharp Cheddar Cheese, cubed
1 T butter, cut into mini cubes
1 C small pasta noodles of your choice, cooked and drained (I used whole wheat rotini-healthier!)
1/8 t. salt
1/8 t. pepper
Directions:
Whisk together egg, salt, pepper and milk in small bowl. Add cubed cheese and coat the cubes. Add pasta to coat.
Pour mixture between two small oven proof dishes
Scatter cubes of butter throughout each dish
Bake at 350 for 15 minutes until eggs are semi-solid.
Eat, or store in the refrigerator and reheat for 1-2 minutes on high until cheese is bubbly.
Friday, July 11, 2008
Tried It...
Thursday, July 10, 2008
Crockpot 365
I saw this lady on Rachel Ray yesterday that made a New Year's resolution to use her crock pot everyday for the entire year! Wow...I know I couldn't do that. I think I am going to try the Indian Curry Recipe. Here is her blog: http://crockpot365.blogspot.com/
Monday, July 7, 2008
Simple Chicken Flautas
1/2 whole chicken shredded
1 can chicken broth
Salsa
vegetable oil
1 cup Monetary Jack Cheese (shredded)
1 cup Cheddar Cheese (shredded)
24 Corn Tortillas
Once chicken is falling off the bones, shred. I only used 1/2 the chicken and that make plenty. I used the rest of my shredded chicken in a casserole the following week.
Scoop about 1 tablespoon of chicken mixture in center of tortilla & sprinkle cheese on top. Roll tightly and place on baking sheet (seam side down). Sprinkle a little more cheese on top. Bake at 400 degrees for 18 to 20 minutes.
Sunday, July 6, 2008
Orange Cake
When I made the cake the first time I stuck to grapefruit and while it didn't look nearly as wonderful as Fanny's, it tasted delicious. This weekend, I decided to make the cake again but deviate from the grapefruit and use orange. I also thought that since it was the 4th of July, I should make two cakes--one chocolate and one white with a common theme of orange throughout. That way, it would be criss-crossed along a red plate and look sort of patriotic.
I cheated on the chocolate cake. I used the box mix, I think it was Betty Crocker. I almost replaced the oil with applesauce, and I almost used the super secret ingredient. But in the end, I just went with the basic box recipe with the addition of orange zest for a refreshing twist. When I was taking the orange out of the refrigerator, I saw the chocolate chips, so I thought, this too!
It turns out that chocolate chips sink to the bottom when baked in a chocolate cake. However, this ended up being a good thing and the cake had a light fudgey bottom layer.
I followed Fanny of Foodbeam's recipe for the yogurt cake exactly except I replaced the grapefruit zest with orange zest and I didn't use the juice glaze on the top.. I also made the cake in an 8x8 square glass pan. (I have made it in a regular circular cake pan before and I like it better because the cake is thinner.
For the glaze, I used the Betty Crocker Cookbook recipe for Vanilla Glaze and replaced the vanilla with orange zest. The recipe doesn't specifically say to leave the pan on the heat the whole time, but that seemed to be the only way it worked. I poured the same glaze on both cakes and had a little bit leftover--but the resulting look was a little messy.
Chocolate Orange Cake with Orange Glaze
Ingredients:
For Cake:
1 box chocolate cake mix (and whatever it needs to make it)
zest of 1 Med. Orange
1 Tb zest (add.)
6 oz. semi-sweet chocolate chips
For Glaze:
5 1/3 TB butter
2 C. powdered sugar
1-2 TB fresh squeezed orange juice
1 TB orange zest
Directions:
1. Make cake batter as suggested
2. In the last 30 seconds of the 2 minute mix, add orange zest and chocolate chips.
3. Bake as directed, cool completely.
4. Meanwhile, melt butter in a 1 1/2 qt. saucepan over low heat
5. When butter is melted, slowly add powdered sugar until dissolved.
6. Add orange zest to mixture
7. Add a little bit of orange juice until thickened and mixture is pourable
8. Drizzle mixture over cake for desired effect, glaze thickens as it dries.
Saturday, July 5, 2008
Circus Train Cake
Initially, I wanted to make a gear cake. The idea was to take some gear templates and cut circular cakes into gear shapes, frost them brightly, and position them with touching teeth as though they were turning together. I think it would look awesome, however, when I brought up this idea to my sounding board they said likely nobody would know what it was and I should do something more recognizable.
With dashed dreams, I decided to move on and make a Train Cake. I wasn't interested in any cake molds, I wanted a 3-D train cake. Later, as I scoured the internet for information about how to make a train cake, I decided that the perfect train, would be a circus train.
The first piece of this project was to find some circus animals. Finding plastic animals that were not too heavy and more circus-like than jungle-like proved to be very difficult, and a little more expensive than I had initially planned. Not having kids myself, I wasn't really in tune with kids culture. I learned that there is a Nick Jr show called the Backyardigans who have a circus and have circus toys. I purchased some of these at Target but was sad they were so expensive, once I got home, I realized they were also a little too heavy, so the search continued. Finally, in one last vain attempt to find circus animals, I went to Toys R Us and found that the TV show Go Diego Go has a safari set of animals. While I was going for the circus, the jungle sets had a lioness, an elephant, a giraffe and a zebra, all animals I wouldn't be surprised to see at a circus, and the price was right. Thanks Diego!
Once I had my animals, the real planning began. I already knew that I had to make the same kind of cake that we always make for birthday parties--Betty Crocker Pudding in the Mix chocolate cake (made with super secret special ingredient for extra moistness) with homemade butter cream frosting and coconut shavings. Knowing the cake was half the battle, getting the cake to not fall apart and be the right shape was the next.
Two weeks before the real baking, I did some test baking. I baked a couple of cakes in a variety of pans trying to find the perfect shape. I made a cake in an 8x8 pan, but it cracked in the middle and was too thin. I made a cake in a large loaf pan, and I made three LEGO brick cakes from a silicon LEGO pan. The LEGO looked like they would be a little too hard to frost. I decided the loaf pan was my best option. I had already read on other sites that the loaf pan was what to use--but I think all the other sites used miniature loaf pans, probably one train car for each child. Since this party was for adults instead of children, I decided to use the big loaf pans--I thought this would also help me to make less cake. Boy, was I wrong about that.
I think I ended up making eight loaf pans of cake. I just wanted to make sure I had enough and didn't come up short. I made all the cakes early in the morning so they would have time to cool before frosting.
For the frosting, I purchased at a craft store some gel style food coloring. I read that this would give me the best bright colors. I didn't read that if you use too much of this stuff it leaves a tiny bit of a bitter taste. Apparently though if you aren't taste testing spoonfulls after spoonfulls of frosting and you are just eating the cake, the bitterness is not noticeable. The internet was right though, the colors were pretty bright. I made red, yellow, green and blue frostings.
I know for sure I had a lot of leftover frosting. I just kept baking and making because I was worried about it.
I read on the back of the shredded sweetened coconut bag that you could make colored coconut by mixing coconut, a little water, and food coloring (the regular bottled kind) in a zip-top bag. Originally, I planned on making several colors of coconut, but in the end I decided on yellow only to pose as hay for the animals. I also planned on making cages for the animals but the little stirring straws didn't look right so I decided against it at the last minute.
The assembly proved to be the hardest part of the entire project. I already had the vision, all I had to do was build it. I wouldn't have been able to do it myself, so I elected my wonderful fiance to help out. For the caboose and engine we cut an extra cake in half and put it on top. We used toothpicks to hold the cake together. We thought it would be a good idea to cut off the corners and the top to make the cakes flat, but actually, cutting them made it a little crumbly and actually harder to frost. It was very difficult to keep the crumbs from darkening the frosting. My fiance was an excellent froster as it turned out.
We put each finished frosted cake into carrying pans because we had to cake the 80 miles for the party and we were worried about it staying together in the car and not melting or anything in the November heat.
Upon arrival, we set out a large piece of thick posterboard that I had purchased at the craft store. We positioned the cakes along the board in a half moon shape. On either end of the train I placed Lego train tracks that I had on hand--you could use any kind of tracks you have available but these worked out great. We took a tube of pre-made frosting and glued white M&Ms onto the Oreos to make hubcaps for the wheels. Then we used the same tube frosting to glue the cookies to the sides of the cakes. We put other M&Ms as decoration on other parts of the train including lights. Then we spread the coconut on all the other cars and placed the animals. The end result was a cake to remember. I bet I'll be making cakes for future birthdays after this marvelous performance!
Ingredients:
Oreos
M&Ms
Candle that looks like smoke stack
Plastic Circus Animals
Disposable Loaf Pans
2 train tracks
Thick posterboard or piece of cardboard covered in foil
Coconut
Food Coloring - gel or liquid
Cake of your choice - I made chocolate, since they are individual, you could use different kinds for each car
Frosting of your choice - I made a traditional butter cream from scratch but you could use pre-made frosting
1 tube pre-made frosting any color
Friday, July 4, 2008
Red Velvet Cupcakes w/ White Chocolate Peppermint Frosting
Use reduced-fat sour cream, and you'll sacrifice only fat and calories, not flavor. If you can't find plain German chocolate cake mix, buy the pudding in the mix version and forgo the added pudding. For more chocolate flavor, use chocolate pudding mix instead of vanilla, but the cake won't be as red in color.
Preparation Time: 10 minutes